Sunset near Warwick

Condamine River

Completed 20 April 2021

The Condamine River is the most diverse section of the entire waterway. From a gentle stream in highland farmland surrounded by rainforests, it is channeled into a forested gorge before entering the wide farming plains of the Darling Downs.

The Condamine River is also the most technical of the rivers that make up the Darling River system. Grade II rapids, highly variable river levels and notoriously bad log jams make for a challenging trip.

Map with 100 hazard and warning icons all over it

It was by a campfire beside the Condamine River during Christmas in 2015 where the idea to kayak the Murray-Darling river was first born. However, this also marked the beginning of a severe dry spell that plunged the eastern states of Australia into a prolonged drought, resulting in no flow in the system at all.

Four years later, the rivers of the Darling Downs finally had their first significant rains in over five years, allowing me to put my inflatable kayak into the headwaters and finally begin the trip. I was able to complete some sections, including the Condamine Gorge and the Culgoa River, but COVID-19 restrictions delayed the rest of the trip for almost a year.

In 2021, a rare flood event finally allowed me to finish the trip with a fantastic high flow on the Darling River.

With an almost unprecedented third consecutive La Niña event in 2022, I seized the opportunity to repeat the entire journey in a single continuous trip, and allowing me to explore the system in a much more intrepid fashion.

I paddled the upper Condamine on a moderate flow, but well below flood levels. Due to the high banks along with the large number of fences, strainers and log jams, I would not recommend tackling the section from The Head to Talgai Weir in flood conditions.

Key Waypoints

  • -5 km

    Mount Superbus

    Looking over farmland with a stream towards a large rounded and forested mountain
    Elevation 1,375 m
    Coordinates 28° 13' 18.1" S, 152° 27' 22.3" E

    Detour up South East Queensland's highest peak that towers over the source.

    A steep and hard Grade 4 walk up the ridgeline to the viewless summit that would get very slippy if wet. Some navigation required, especially if you head to the second cairn. Interesting detour to the Lincoln Wreckage or the lookout at Lizard Point and The Steamers.

    Additional information about the walk can be found here.

    Pile of stones in among tree ferns

    My Personal Journey

    1st Source-to-Sea
    Date 3 Jun 2020

    It was nearly four months after I had started my first source-to-sea trip in February that the COVID-19 restrictions eased. This relaxation allowed me to head out and tick off the return hike from the first crossing along the road to the source (22 km). At the same time, I also climbed South East Queensland's highest peak, Mount Superbus (1,375 m), which towers over the upper Condamine River.

    2nd Source-to-Sea
    Date 23 May 2022 Flow 800 ML/day @ Brosnans Barn

    I walked a very muddy and slippery track to the summit to start my second source-to-sea trip, this time attempting a single continuous trip using the same boat.

    Overall, it was a quiet, misty winter's day with only herds of cattle keeping me company as I walked down to the first crossing. The river was dangerously high, and any progress was halted while I waited for the water levels to fall.

  • 0 km

    Source

    green paddocks with gully
    Elevation 781 m
    Coordinates 28° 13' 53.0" S, 152° 28' 56.3" E

    Even in flooding, the upper 15 km is not traversable via any form of watercraft and runs through private farmland. Please respect the farmer and the farm's biosecurity and do not walk across their land.

    Spring near the Main Range.

    There is a seep in the paddock beside Spring Creek Rd, but there is a spring within the cliffs that is usually considered to be the true source of the South Branch of the Condamine River. The source and the first kilometer traverses private property before the first pipe culvert on Spring Creek Rd.

    Looking across paddocks to the gorge lined with cliffs and forested sections
  • 19.0 km

    Cambanoora Gorge (First Crossing)

    River rapids
    Distance between locations 19 km Elevation 650 m Slope 10.23‰
    Coordinates 28° 17' 22.9" S, 152° 23' 49.9" E
    Gauge: The Head, BoM
    Flow: recommended: 2.2 m to 2.5 m

    Cambanoora Gorge runs between the source of the Condamine River and Killarney, QLD. It is also known as the Condamine Gorge.

    Put in at or just above the first 4wd crossing of the river. I started near the gate as you leave the farmland for forest about 4.5 km upstream of the first crossing.

    Clifts sticking out of the forest

    Levels under 2.1 m at The Head are likely to become difficult to paddle the bouldery sections of the gorge. You should expect about a dozen or more fences across the creek. Most farmers used barbed wire so be careful!

    1.9 m at the Head represents almost zero flow and levels drop quickly after heavy rain. On an average year, there are 55 days at or above the recommended flow at Killarney (Brosnans Barn), but only 4.5 days at or above 1 Cumecs (~2 m) at the Head.

    Creek with hardly no flow

    Normal flow, gauge height 1.9 m

    Rapids in a creek

    High flow with heavy rain, gauge height 2.2 m

    My Personal Journey

    1st Source-to-Sea
    Date 15 Feb 2020 Flow 2.23 m @ The Head

    Due to a late start, I only managed a couple of hours of paddling on the first day. Nevertheless, it was an enjoyable start to the trip with a starting river height of 2.23 m. The following morning, I awoke to a noticeably lower river level of 2.08 m, but it was still high enough to provide a pleasant paddling experience. I had enough control to stop for the barbed wire fences that were common in the lower sections.

    2nd Source-to-Sea
    Date 27 May 2022 Flow 0.98 m 365 ML/day @ Brosnans Barn

    Because of the large number of logs across the river and the rocky Grade II/III rapids, I decided to portage the top section in my sea kayak. I walked the kayak from the area adjacent to the North and South Condamine Junction, down through the first seven crossings, and put in at the eighth. I found the Grade I/II rapids and riffles downstream to be reasonably manageable in the sea kayak, but I still had a couple of close calls and a single capsize while trying to squeeze under a log.

    Kayak with heavy load
  • 40.1 km

    Killarney

    Logs blocking the river
    Distance between locations 21 km Elevation 508 m Slope 6.76‰
    Coordinates 28° 20' 17.2" S, 152° 17' 43.1" E
    Population 954 General Store
    Gauge: Brosnans Barn, BoM; QLD WMIP
    Catchment: 92 sq km
    Flood: minor: 3 m, moderate: 4 m, major: 5 m
    Flow: no flow: 0.36 m, recommended: above 0.55 m

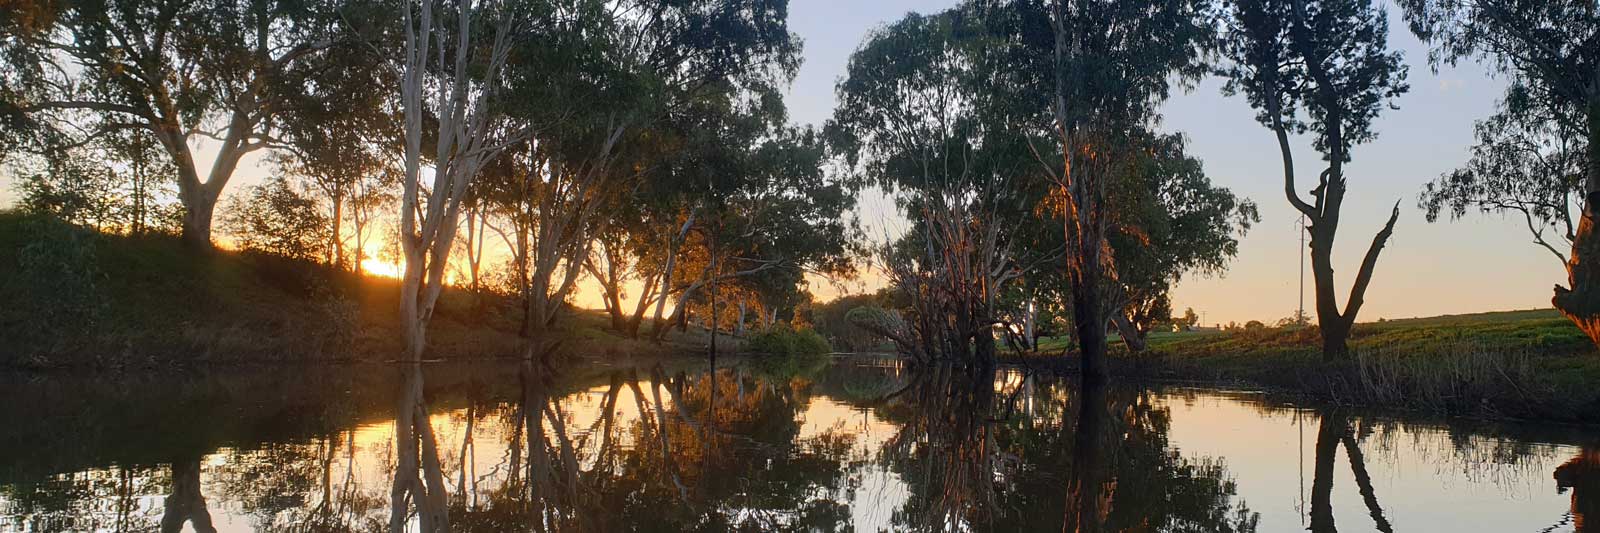
    From what would best be described as a narrow deep drainage ditch surrounded by River She-oaks (Casuarina cunninghamiana) below Killarney, the river started to open up around Murrays Bridge (~halfway to Warwick) where farmland dominated with sections lined with River Red-gums (Eucalyptus camaldulensis) as well as willow trees.

    Road crossings and weirs become common and the majority of these are unmarked. Stay alert!

    Steep bank beside creek
    Creek through farmland with scattered trees

    My Personal Journey

    1st Source-to-Sea
    Date 16 Feb 2020 Flow 0.78 m 200 ML/day @ Brosnans Barn

    Despite the river height falling from 0.98m to 0.64m, it was still an enjoyable experience, although the decreased flow definitely made it slower. It was easy enough to control the kayak around the numerous log rafts/jams from the recent floods. This section was tough on both my boat and my skin as I tackled the log rafts.

    2nd Source-to-Sea
    Date 28 May 2022 Flow 0.9 m 300 ML/day

    With a higher flow and a plastic boat, this section was significantly faster and easier. There were only three log rafts and maybe a dozen downed trees to climb through. Even though I was extremely careful in the short sea kayak, I had two capsizes while navigating falling logs and a couple of nose-tail pins in the narrow creek.

    Kayak with rips to canvas
  • 110 km

    Warwick

    Bridge
    Distance between locations 70 km Elevation 447 m Slope 0.87‰
    Coordinates 28° 12' 32.0" S, 152° 2' 16.4" E
    Population 15,380 Supermarket(s) Climate
    Toilets in Rotary Park
    Gauge: Warwick, BoM; QLD WMIP
    Catchment: 1,360 sq km
    Flood: minor: 5 m, moderate: 6 m, major: 7 m
    Flow: no flow: 0.69 m

    River felt like it had dropped to a more "normal" level with a healthy rainfall at 0.91 m, as opposed to no rain for years. Crossings and weirs made for mostly flatwater paddling and minimal assistance from the flow around Warwick.

    The next section downstream is mostly unregulated until you reach Talgai Weir. You really need to be ready to go quickly after heavy rains to use the current. A flow higher than 1.5 m above normal should allow you to paddle over many of the fences across the river.

    Warwick is the last major supply pickup before Chinchilla, which is 426 km downstream. The small country store at Cecil Plains can be used for basic supplies. Dalby is a fairly long detour off the river. Benz Auto Dismantlers in Warwick may be able to offer long term car storage.

    Large number of parrots in a tree
    Brown snake hidden in the vegetation

    My Personal Journey

    1st Source-to-Sea ('20)
    Date 19 Feb 2020 Flow 0.98 m 240 ML/day @ Warwick (Scots Collage)

    Sadly, my inflatable kayak had a fatal encounter with a sharp log and my initial trip ended prematurely just past Warwick. In a way, this was lucky as I was falling off the back of the flow and I would have run out of water before reaching Cecil Plains.

    1st Source-to-Sea ('21)
    Date 09 Apr 2021 Flow 1.38 m 1,600 ML/day

    A year later, I returned with a plastic sea kayak and a much higher flow. The paddling conditions were good, with only a few downed trees and fences to contend with.

    2nd Source-to-Sea
    Date 30 May 2022 Flow 1.3 m 1,300 ML/day

    Most of the fences were washed out from the floods, and there was only one downed tree to portage. However, there were still a dozen or so other portages over the weirs and crossings.

  • 336 km

    Cecil Plains

    Country town with deserted streets
    Distance between locations 226 km Elevation 355 m Slope 0.41‰
    Coordinates 27° 32' 1.3" S, 151° 12' 14.8" E
    Population 429 General Store
    Toilets at Apex Park or the Caravan Park in town
    Gauge: Cecil Plains Weir, BoM; QLD WMIP
    Catchment: 7,795 sq km
    Flood: minor: 6 m, moderate: 7 m, major: 8 m
    Flow: no flow: 3.66 m

    Tiny general store and a pub in the town.

    Running river
    Flowing Condamine at Cecil Plains. 710 ML/day
    River with hardly no water
    Five days later, there was no flow

    Other possible towns on the way to Cecil Plains seem very limited and off the track:

    Clifton
    Coordinates 27° 55' 45.1" S, 151° 54' 22.0" E
    Population 1,456 Supermarket(s)

    19 km E along Clifton Leyburn Rd

    Millmerran
    Coordinates 27° 52' 44.0" S, 151° 16' 9.5" E
    Population 1,563 Supermarket(s)

    13.2 km SW along Gore Hwy from the bridge

    Small overgrown creek

    Condamine River (North Branch)

    The north branch rarely flows outside of flood events. The inlet was dry on both my trips even though the gauges suggested some flow. The north branch does not go past Cecil Plains and it is a 7.3 km walk west to the store from Pampas Bridge.

    Gauge: Lone Pine, Nth Condamine Branch, BoM; QLD WMIP
    Flood: minor: 3.5 m, moderate: 4 m, major: 5 m
    Flow: no flow: 1.81 m
    Twisted gum trees reflecting off the still waters

    My Personal Journey

    1st Source-to-Sea
    Date 13 Apr 2021 Flow 3.98 m 620 ML/day @ Cecil Plains
    2nd Source-to-Sea
    Date 3 Jun 2022 Flow 4.23 m 1,600 ML/day
  • 397 km

    Loudoun Weir, Dalby

    Weir with water spilling over it
    Distance between locations 61 km Elevation 328 m Slope 0.44‰
    Coordinates 27° 13' 26.4" S, 151° 11' 3.5" E
    Population 12,719 Supermarket(s) Climate
    Gauge: Loudoun Br, BoM; QLD WMIP
    Catchment: 12,380 sq km
    Flood: minor: 2.5 m, moderate: 3.5 m, major: 5.5 m
    Flow: no flow: 1.78 m

    Dalby is 10 km north east of the Moonie Hwy Bridge.

    Warra
    Coordinates 26° 55' 49.1" S, 150° 55' 13.1" E

    6.5 km north of the bridge along Warra Kogan Rd

    Brigalow
    Coordinates 26° 51' 19.1" S, 150° 45' 37.1" E
    General Store

    3.75 km north of the bridge along Banana Bridge Rd.

    Bridge with large pile of logs

    My Personal Journey

    1st Source-to-Sea
    Date 14 Apr 2021 Flow 2.0 m 450 ML/day @ Loudoun Br
    2nd Source-to-Sea
    Date 4 Jun 2022 Flow 2.45 m 2,200 ML/day

    Mostly a flat water section from long weir pools down to Chinchilla. I had a similar experience on both trips albeit I had some current assist with the higher flow.

  • 538 km

    Chinchilla Weir

    Weir with water spilling over it
    Distance between locations 141 km Elevation 298 m Slope 0.21‰
    Coordinates 26° 48' 2.9" S, 150° 34' 39.0" E Date Weir
    Population 6,612 Supermarket(s)
    Gauge: Chinchilla Weir, BoM; QLD WMIP
    Catchment: 19,190 sq km
    Flood: minor: 6 m, moderate: 8 m, major: 10 m
    Flow: no flow: 0.74 m

    The weir is 9 km from town. I stopped beside the rifle range and walked to town (6.5 km) for supplies to get me to the next major town that was St George (475 km), even Surat is 296 km away.

    The first true rapids since the gorge were a few kms from the weir. This was the first of about four or five rocky sections before Surat. With an OK flow these are mostly about Grade I with a couple of easy Grade II rapids. Portage required on a poor flow and will wash out on higher flows.

    My Personal Journey

    1st Source-to-Sea
    Date 16 Apr 2020 Flow 1.05 m 150 ML/day @ Chinchilla D/S

    With a flow of under 86.4 ML/day at times, I had to portage the kayak through the rocky sections and also through some of the shallow sandy sections that were most common at the top of pools. Care was needed as this soft sand was deep, and I sank up to my chest a couple of times, only to arrest myself by grabbing the boat. Log jams and fallen trees were a constant battle in the low flow, requiring multiple in-creek and bank portages.

    2nd Source-to-Sea
    Date 7 Jun 2022 Flow 2.4 m 2,700 ML/day

    With this flow, the entire section between Chinchilla and E.J. Beardmore Dam can be generalized as having long, slow-flowing pools with pleasantly flowing interconnecting sections. The rapid sections were fun, with only one slight scrape on the hull on a wide, shallow rapid section.

    Gas bubbles on the water

    Methane seeps were fairly common on the lower Condamine. There is still some debate on the cause of these, from being a natural phenomena to a byproduct of the large gas fracking industry in the area.

  • 624 km

    Condamine

    Weir with water spilling over it
    Distance between locations 86 km Elevation 274 m Slope 0.28‰
    Coordinates 26° 55' 33.6" S, 150° 7' 50.5" E
    Population 384 General Store
    Toilets in Pioneer Park beside bridge
    Gauge: Condamine Township, BoM
    Flood: minor: 5 m, moderate: 7 m, major: 8 m

    Roadhouse and pub.

    River flowing over shallow rocks
  • 730 km

    Dogwood Creek

    Mouth of a river with high dirt banks
    Distance between locations 106 km Elevation 261 m Slope 0.12‰
    Coordinates 27° 3' 21.6" S, 149° 37' 32.9" E
    Gauge: Cotswold, BoM; QLD WMIP
    Flood: minor: 7 m, moderate: 10 m, major: 11 m
    Flow: no flow: 4.3 m

    Balonne River starts where the Condamine and Dogwood rivers join.

    This is approximately halfway between the small towns of Condamine Township and Surat (~200 km); and halfway between Chinchilla and St George (475 km).